Documentation
Download and install
- Download
- Unzip
- Install: copy it in your php server folder: <myproject>
- Create your mysql database
- Execute the sql scripts
- set the mysql connection: "masterdata/_mysql.php"
- set the domain variables: "masterdata/_init.php"
Set the mysql connection
Open the file "masterdata/_mysql.php" and set the connection parameter to your mysql-server: server, username, password and database.
Execute the SQL script
Please execute the following scripts from the folder "mysql":
- k8basic.sql
- k8examples.sql
the username admin, password admin is also added. Dont forget to register new user for testing.
masterdata/_init.php
here are the global variables declared:
- domain_name
- ...
- domain_languages
- domain_nativelanguage
- ...
- domain_datadeffiles
- domain_projectpath=<myproject>
You have to write your project-datadefinition file in this array, for example:
- myproject/_datadefinition_myproject.php
Getting started
index.php
Please open your web project in your browser. You get the "K8 Web Kit" page with menu and login form. The menu contains the following items:
- Head Menu
- K8 Web Kit / <myproject>
- Example
- Register / My data
- Admin
- User list
- Foot Menu
- Contact
- Legal Notice
Home: K8 Web Kit / <myproject>
This is the main page of your website. Here you get the heighest attention. In our example the login / logout dialog is displayed. To change this part search in this file for: $page=="home".
Example
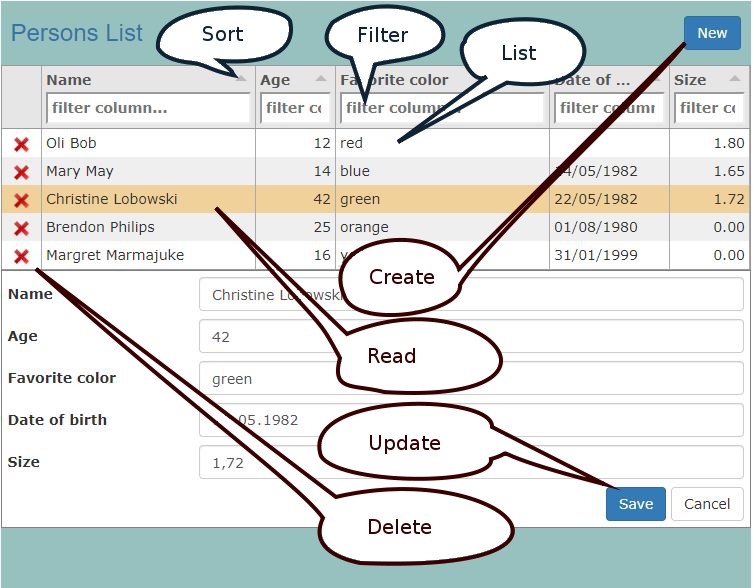
The datadefID=1, "Persons List", is displayed. This is an easy master data example without a table in the database and without right check.
Register / My Data
To use the data access rights you have first to register and to login. After registration and login you can upload a profile picture and add other user as friends.
Please register with a new user, for example: demo
Admin
this menu is only displayed, when an admin (password=admin) is logged in. In the admin/user list all registered user are displayed.
project structure
this are the main folders in your project:
- css
- example.css
put your style sheets here
- example.css
- js
- example.js
write your Javascript here
- example.js
- img
put your images here - uploads
all uploads are saved here - myproject
- _datadefinition_myproject
declare your datadefinition here - _select_myproject
define your selects here - add your project files here
- _datadefinition_myproject
this are the main files in your project:
- index.php
- _init_page.php
pages array - _head.php
link for Javascript and style sheets - _header.php
the menu - _footer.php
the footer
localhost/myproject/index.php
check it out: index.php
Menu
The header of the page, banner and menu, contains "_header.php". In the "ul", class "navbar-nav" the menu items are listed. Here you can modify your menu.
Item Master Data
Example
Master data form on the fly: Call it with your table and get automatically a master data form!
Generate a datadefinition and configure the list columns and the form with JSON to get it functionally and good looking!
Listing record functions:
- List
- Sort
- Filter
Crud functions:
- Create, New record
- Read, Load record
- Update, Save record
- Delete record
Simple Catalog
ExampleThe first catalog example needs no tables. Take an easy Javascript datastructre and simple HTML templates for the first 3 exercises:
In this excercise you create the following pages:
- a simple phone list
- an editable phone list
- an easy catalog
Crud functions:
- Create, New record
- Read, Load record
- Update, Save record
- Delete record
Object Data Form
Example
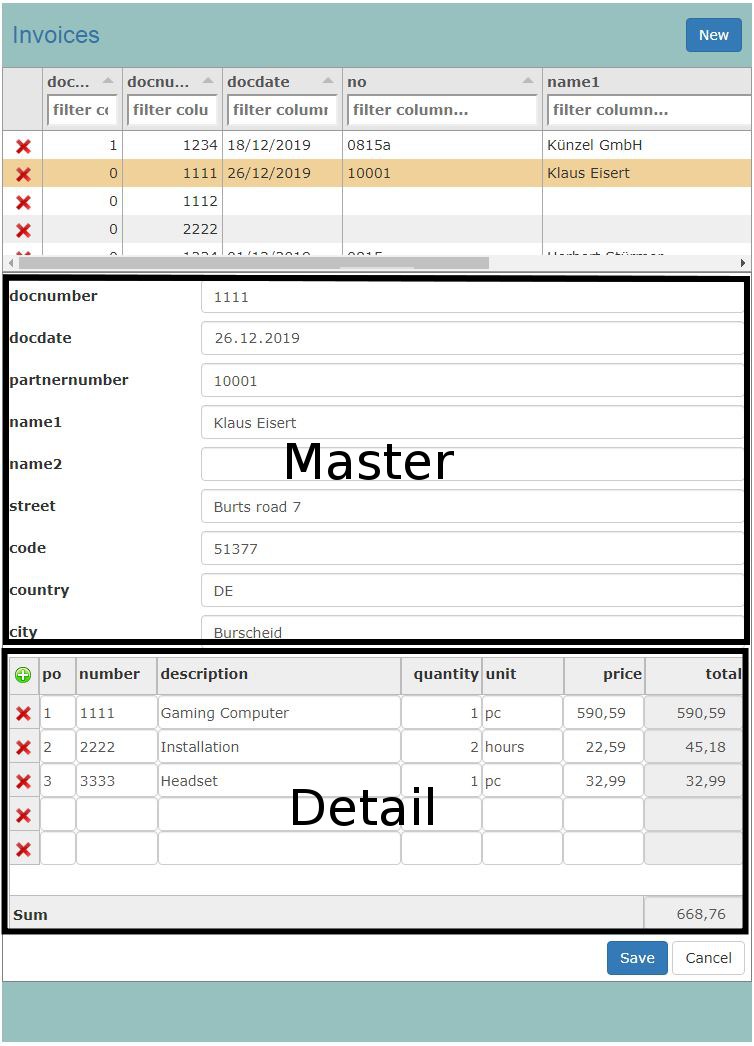
Invoice Object
The invoice object consist of 2 parts
- Master: Invoice header
- Detail: Invoice items
Backend
The relationship between Master- and Detail-table is defined by the key columns. Any number of children and nested children is possible.
Frontend
The Master part is automatically generated with jsonform. The detail area is created with html templates.
Listing record functions:
- List
- Sort
- Filter
Crud object functions:
- Create, New record
- Read, Load record
- Update, Save record
- Delete record
Catalog
ExampleTake the HTML templates. Create and modify your catalog, the detail page and generate the input form!
In this excercise you create the following pages:
- catalog
- detail
- member
- input form
Crud functions:
- Create, New record
- Read, Load record
- Update, Save record
- Delete record