The item catalog example
Introduction
This classic web catalog brings the person who have an offer together with the persons who accept the offer.
The catalog items can inserted by registered user. Images can be uploaded. The post can be prepared, published and closed. After a search in the catalog, the details will be displayed on a detail page. By choosing an item your individual programminig starts.
Basic table for the items is: k8components:
Generate a new datadefinition for k8components
The datadefinition contains details for reading, saving and displaying a recordset. For more informations look: datadefinition.
The following steps are necessary to create your own datadefinition:
- create your table: k8components (already created with "k8examples.sql")
- generate your datadefinition
- here, have a look to:
new datadefintion - in your developement:
newdatadefinition.php?table=k8components&datadefID=k8components
- here, have a look to:
- in your folder myproject create a folder: k8components.
- save the datadefinition in your folder k8components with the name "k8components" as json file.
- look in your browser:
index.php?datadefID=k8components&page=masterdata
the container snippet myproject/k8components/k8components.json:
localhost: index.php?datadefID=k8components&page=masterdata
1st master data form: item master data
Optimize your datadefinition
This are the main parts of your datadefintion which we want to extend:
- displaycolumn
- displaydescription
- headertitle
- headerdescription
- masterdata
- filters_catalog
- sql_derived
- rights
- tabulator
- change visibilty
- add column: username
- k8form
- change layout to display 2 blocks
- remove unnecessary fields
Display your definition as masterdata form in the browser:
- index.php?page=masterdata&datadefID=k8components
(you only can insert data, when you are registered and logged in!)
the container snippet myproject/k8components/k8components.json:
(by copying this content replace "k8compmin" with "k8components")
later we use this item list for administration overview
localhost: index.php?datadefID=k8components&page=masterdata
result after optimizing: optimzed item form
Adding image upload
The image upload is established by dropzone. In the section masterdata the upload is enabled and the parameter for dropzone are set:
The images are resized before they are uploaded.
the container snippet myproject/k8components/k8components.json:
(by copying this content replace "k8components_2" with "k8components")
localhost: index.php?datadefID=k8components&page=masterdata
result: item form with images
Adding tinymce and validation
To make "descriptionlong" to a tinymce editor we need the tinymce library and JavaScript call back functions:
- datadefinition
- script: tinymce.min.js
- script: k8pages.js
- k8components_datadef.js
- call back functions
- dataCreateStructure(..)
- dataLoad(..)
- dataNew(..)
- upload.settings.dataAfterUpload(..)
- function
- tinymceInit(image_list,disabled)
- call back functions
With this line in the datadefinition the JavaScript is added to the datadefinition:
Please overwrite the datadefinition: myproject/k8components/k8components.json:
Attention, please replace "kitsamples" with <myproject>
In the k8form section the class of the field "descriptionlong" is added with "tinymce", the selector to bind tinymce.
Later we use this item list for administration overview and without tabulator as edit form for the user entries.
Please create the JavaScript file: myproject/k8components/k8components_datadef.js:
Validation
- html
- field "text1" required
- status==(published or closed)
- JavaScript "dataBeforeSave(..)
- field "textdimensions" required
- uploaded images required
- PHP
- file: k8components_validate.php
- componentnumber required
- text1 required
- textdimensions required
- descriptionlong required
- minimum 1 uploaded image
- file: k8components_validate.php
- JavaScript "dataBeforeSave(..)
- PHP: table columns are all checked for valid input
This is only an example for the different levels of validation. Opitmize the validation in your procject, please.
Please create the PHP file: myproject/k8components/k8components_validate.php:
Display your definition as masterdata form in the browser:
- index.php?page=masterdata&datadefID=k8components
(you only can insert data, when you are registered and logged in!)
Attention due to the url of the images, the page is opened in webkit folder.
localhost: index.php?datadefID=k8components&page=masterdata
result with tinymce: tinymce item form
Webpages
This will be the pages of your Website:
- public
- Home
- Catalog
- Detail
- Register
- member
- My Items
- in preparation
- open items
- closed items
- My Items
- admin
- Users
- items
New pages:
- catalog
- detail
- member
- admin
- item list
Preparing the pages
For the member and item list a login is necessary. This has to be defined in the pages array in "_init_page.php".
The login flag is set to true (1). Purpose: if you are not logged in the login dialog appears first. Set the js_display property to masterdata1; so javascript appends it to the masterdata1 element.
Menu
We will enter additional pages in the menu. This is build up in the php file: _header.php
Open the file and put in your example. The member menu is only shown, if you a member is logged in. The admin menu is only shown when an admin is logged in.
You have to set the admin flag by help of your mysql administration tools. The user 'admin', password 'admin' is already inserted by the sql script.
The file for the menu: _header.php:
<!-- insert the menu here -->
Please login as admin 1st!
localhost: index.php?page=item_list
The Catalog
For the catalog we need the following html files:
- layout
- container
- record
- blank
- nodata
The layout defines the area for search and resultarea.
The record displays the catalog items: image, tiltle, publisher, description and additional fields. In the title line are 3 controls:
- the title itself with the link to the detail page
- edit: loads the item form
- delete: deletes the item
the container snippet myproject/k8components/k8components_catalog_layout.html:
the container snippet myproject/k8components/k8components_catalog_blank.html:
the container snippet myproject/k8components/k8components_catalog_container.html:
the container snippet myproject/k8components/k8components_catalog_record.html:
the container snippet myproject/k8components/k8components_catalog_nodata.html:
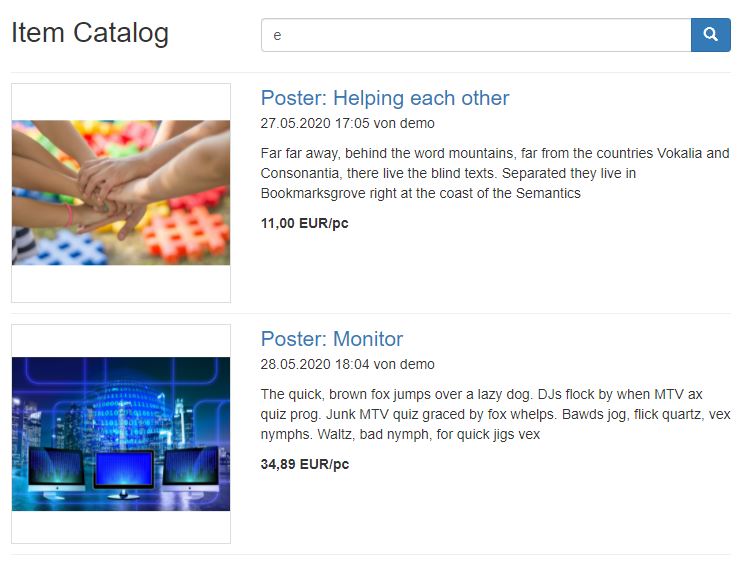
localhost: index.php?datadefID=k8components&page=catalog
detail page
The desired record is already read by php. The title and description of the website is taken out of the defined columns in the datadefinition. The record is transfered to Javascript and displayed by the HTML element. The HTML Element needs 2 templates:
- container
- record
The templates are similar to the catalog. The image takes half of the website wide. More images are in the thumbnail galery. The long description of the item is displayed beneath the image.
the container snippet myproject/k8components/k8components_detail_container.html:
myproject/k8components/k8components_detail_record.html:
localhost: index.php?datadefID=k8components&page=detail&keyvalue=1
member page
Here on the member page we want to dispay the catalog entries of the member in 3 categories:
- in preparation
- published
- closed
The url for the page is: index.php?page=member.
So we prepage the HTML layout with 3 HTML tags for each category (k8components_member_layout). With Javascript the catalog elements are placed in the HTML tags. There for we add the Javascript snippet in js/example.js.
myproject/k8components/k8components_member_layout:
This JavaScript snippet has to be inserted in js/example.js:
at /* insert your code here */
localhost: index.php?page=member